Difference between revisions of "Creating Event Forms"
(Undo revision 835 by Jeff Epperson (talk)) |
|||
| (24 intermediate revisions by the same user not shown) | |||
| Line 1: | Line 1: | ||
| − | Path: [[Callproof Support]] - [[Website | + | Path: [[Callproof Support]] - [[Website]] - [[Event Forms]] - [[Creating Event Forms]] |
| + | |||
| + | {{#ev:youtube|rCvf4c1WTEI|400|right|Creating Event Forms}} | ||
| + | [[File:eventforms_index.jpg|200px|thumb|right|Index of Event Forms]] | ||
When clicking on Event Forms from the Home tab, you will see the Event Forms index page. This is a list of all the Events Forms currently setup for your account. | When clicking on Event Forms from the Home tab, you will see the Event Forms index page. This is a list of all the Events Forms currently setup for your account. | ||
| Line 7: | Line 10: | ||
If you want to create a new Event Form, click Add Event Form located on the top right of the main info pane. | If you want to create a new Event Form, click Add Event Form located on the top right of the main info pane. | ||
| + | |||
| + | |||
| + | |||
| + | |||
== Add Event Form == | == Add Event Form == | ||
| + | [[File:eventforms_add.jpg|200px|thumb|right|New Event Form]] | ||
| − | + | Click Add Event Form to create a new Event Form and add a name. Name it anything. | |
Notification Emails are automatically generated when an Event Form is submitted. The email addresses listed here will get an email immediately that contains all the information submitted. | Notification Emails are automatically generated when an Event Form is submitted. The email addresses listed here will get an email immediately that contains all the information submitted. | ||
| Line 16: | Line 24: | ||
Points can be assigned for each Event Form. These are used in Sales Rep rankings. | Points can be assigned for each Event Form. These are used in Sales Rep rankings. | ||
| − | Limit Contact Types allows | + | Limit Contact Types allows administrators to limit when the form is available. If the contact type they are dealing with matches what is selected here, the form will be available and show under Event Forms in the app and website. Default is for a form to always been available. Select a certain contact type to limit. (Example: Demo company has a contact type of Current. Event Form called Renewals can be used for current customers renewing. Selecting Current under Limit Contact Types means the system will only offer the Renewals Event Form is the contact they are dealing with is of type Current.) |
Post Back URL, Secret Key, Send Method are advanced features and will be documented soon. | Post Back URL, Secret Key, Send Method are advanced features and will be documented soon. | ||
| Line 22: | Line 30: | ||
== Editing Event Form == | == Editing Event Form == | ||
| + | [[File:eventforms_addfield.jpg|200px|thumb|right|Adding Fields to Event Form]] | ||
| − | After selecting an Event Form, | + | After selecting an Event Form, all the current fields in the Event Form will be shown. If the form is new, no fields will be listed here and the top half will be blank under the header '''Fields'''. |
| − | The bottom half of this screen allows | + | The bottom half of this screen allows administrators to quickly add a new Event Form. |
Remove a field by clicking the Red X right of the field name. | Remove a field by clicking the Red X right of the field name. | ||
| Line 35: | Line 44: | ||
There are 3 different types of fields for use in Event Fields. | There are 3 different types of fields for use in Event Fields. | ||
| − | : Regular Field - These are default fields for contacts within Callproof. (Example: To show the company name on all Event Forms, select Company Name here) | + | : '''Regular Field''' - These are default fields for contacts within Callproof. (Example: To show the company name on all Event Forms, select Company Name here) Changing the value when filling out the Event Form will not change the value in the contact. The changes will only be present in the Event Form. |
| + | |||
| + | : '''Custom Contact Field''' - These are custom fields that have been added to contacts. Select a custom field to have it display on the Event Form. Changing the value when filling out the Event Form will not change the value in the contact. The changes will only be present in the Event Form. | ||
| + | |||
| + | : '''Custom Event Form''' - Create a field specific to this Event Form. This is the only place this information will reside. These can be used when generating reports. This type also includes image fields for uploading images associated with the Event Form. | ||
| + | |||
| + | Select the field to be added on the Event Form and click save within that section. This will put an editable field on the Event Form. If a Regular or Custom field is selected, it will have the information filled in for the current contact. Changes to these values will not carry over to the contact record. The changes will only be present in the Event Form. | ||
| + | |||
| + | When a Custom Event Form image field is used, the end user will be given an option to upload an image or take a picture and upload it. This image will be associated with the contact as well as the Event Form. | ||
Latest revision as of 20:54, 21 June 2016
Path: Callproof Support - Website - Event Forms - Creating Event Forms
When clicking on Event Forms from the Home tab, you will see the Event Forms index page. This is a list of all the Events Forms currently setup for your account.
To edit a form already created, click on the name, notification email, fields, or the notepad. All of these will go to the Event Form Edit page.
If you want to create a new Event Form, click Add Event Form located on the top right of the main info pane.
Add Event Form
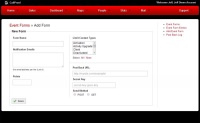
Click Add Event Form to create a new Event Form and add a name. Name it anything.
Notification Emails are automatically generated when an Event Form is submitted. The email addresses listed here will get an email immediately that contains all the information submitted.
Points can be assigned for each Event Form. These are used in Sales Rep rankings.
Limit Contact Types allows administrators to limit when the form is available. If the contact type they are dealing with matches what is selected here, the form will be available and show under Event Forms in the app and website. Default is for a form to always been available. Select a certain contact type to limit. (Example: Demo company has a contact type of Current. Event Form called Renewals can be used for current customers renewing. Selecting Current under Limit Contact Types means the system will only offer the Renewals Event Form is the contact they are dealing with is of type Current.)
Post Back URL, Secret Key, Send Method are advanced features and will be documented soon.
Editing Event Form
After selecting an Event Form, all the current fields in the Event Form will be shown. If the form is new, no fields will be listed here and the top half will be blank under the header Fields.
The bottom half of this screen allows administrators to quickly add a new Event Form.
Remove a field by clicking the Red X right of the field name.
Move fields up and down on the form using the Position Arrows. This is how they are presented to the user select this form.
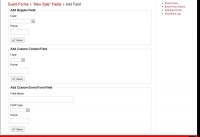
To add a new field, select Add Field on the top right of the fields list.
There are 3 different types of fields for use in Event Fields.
- Regular Field - These are default fields for contacts within Callproof. (Example: To show the company name on all Event Forms, select Company Name here) Changing the value when filling out the Event Form will not change the value in the contact. The changes will only be present in the Event Form.
- Custom Contact Field - These are custom fields that have been added to contacts. Select a custom field to have it display on the Event Form. Changing the value when filling out the Event Form will not change the value in the contact. The changes will only be present in the Event Form.
- Custom Event Form - Create a field specific to this Event Form. This is the only place this information will reside. These can be used when generating reports. This type also includes image fields for uploading images associated with the Event Form.
Select the field to be added on the Event Form and click save within that section. This will put an editable field on the Event Form. If a Regular or Custom field is selected, it will have the information filled in for the current contact. Changes to these values will not carry over to the contact record. The changes will only be present in the Event Form.
When a Custom Event Form image field is used, the end user will be given an option to upload an image or take a picture and upload it. This image will be associated with the contact as well as the Event Form.


