Path: Callproof Support - New Website - Company Directory
Company Directory
Screen purpose: Manage your company’s reps and managers in one place — search them, add or invite new users, enable/disable accounts, and open a profile to set permissions, markets, phones, and more.
- Browse all company users
- Search, sort, and filter by Active / Disabled
- Add a rep (or copy / replace an existing user)
- Edit a user’s settings and access
- Import, export, and invite reps
- Enable or disable accounts
- Jump to tasks, map history, GPS sync, and phones
Screen title: Company Directory
Browser title: Company Directory
Address: /users/
Edit screen: Company Directory » [Name] — /users/edit/<id>/
How this differs from similar screens
| Screen
|
Address
|
What it is
|
| Company Directory (this page)
|
/users/
|
Create and manage user accounts, roles, phones, markets, and access.
|
| Rep Subscriptions
|
/mail/users/
|
Which CallProof emails/reports each user receives — not user creation.
|
| Caller ID
|
/caller/callerid/new/
|
Verify outbound calling numbers for reps.
|
How to open Company Directory
Option A — Main menu
- Sign in to CallProof.
- Open Company Directory / Users from the menu.
Option B — Quick Links (from Titles / related screens)
- Open a screen that includes Quick Links → Company Directory.
Option C — Direct address
- Go to your CallProof site and add
/users/.
- Press Enter.
Permissions
- You must be signed in.
- Access may require Can View Company Directory (or manager access), depending on your company menu setup.
- Adding, editing, inviting, importing, and disabling users is typically a manager / admin task.
- If you do not have access, CallProof may show permission denied and return you to home.
What you see on the list
- Company Directory title
- Add Rep
- Quick Links — Import Reps · Export Reps · Export Reps History Details · Invite Reps · Update User Settings · Rep Stats HTML
Filters
| Field
|
Notes
|
| Search Reps
|
Find users by name / search text
|
| Store Caller ID
|
Dealer companies only — filter by store phone
|
| Sort
|
Name · Reverse Name
|
| User Status
|
Active · Disabled · Both
|
| Filter / Clear
|
Apply or reset the list filters
|
Table columns
| Column
|
What it shows
|
| Name
|
Photo, name, title, Enabled/disabled status, Manager / Can Delete flags, last activity date
|
| Address
|
Address; lat/lon when present; dealer fields (Store, Caller ID, Message Caller ID) when applicable
|
| Markets
|
Markets assigned to the user
|
| Phone Number
|
Mobile app versions (when available), listed phones, Add Phone
|
| Accounts
|
Contact visibility (radius / unassigned), assigned & unassigned counts
|
| GPS
|
GPS tracking On / Off icon
|
| Actions
|
Edit · Add Task · Map history · Sync GPS settings
|
Why Company Directory matters
| Action
|
Purpose
|
When to use it
|
| Add / Invite Rep
|
Give a new teammate access to CallProof.
|
Onboarding.
|
| Edit profile / settings
|
Control role, markets, contact access, Twilio, and more.
|
Permissions or territory changes.
|
| Enable / Disable
|
Turn access on or off without deleting history.
|
Leave of absence or departure.
|
| Import / Export
|
Bulk load or download rep data.
|
Rollouts and audits.
|
| Map / Sync / Phones
|
Support field ops from the directory row.
|
GPS issues, missing phones, follow-ups.
|
Filter the directory
Steps
- Enter text in Search Reps (optional).
- Choose Sort and User Status (Active / Disabled / Both).
- Dealer companies: optionally choose Store Caller ID.
- Click Filter.
- Click Clear to reset.
Add a Rep
Steps — create a new user
- Click Add Rep.
- Fill in the side panel:
- First Name / Last Name
- Email
- Title
- Password / Confirm Password
- Click Create User.
- Success message confirms the user was added; you are usually taken to their edit page.
Copy Existing User
- Fill the new user’s basic fields.
- Click Copy Existing User.
- Choose the user whose settings should be copied.
- Confirm — useful when a new hire should match an existing role setup.
Replace Existing User
- Use Replace Existing User when one person is taking over another’s seat/settings.
- Follow the confirmation prompts (may include disabling the previous account).
Good to know
- Password fields have show/hide eye icons.
- Title defaults may include Other when nothing else is selected.
Edit a user (Company Directory Edit)
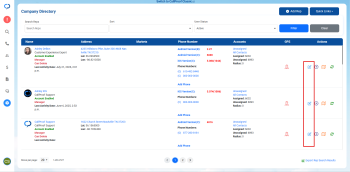 Edit user settings click (pencil) icon |
|
Breadcrumb: Company Directory » [User name]
Address: /users/edit/<id>/
Steps
- Click the user’s name, photo, or Edit (pencil).
- Review sections such as:
- Role (for example Is A Manager)
- User Access (unassigned leads, delete contacts, view company directory, and related toggles)
- User Details (profile information)
- Places Category
- Twilio Setting / Phone Number Management (when enabled)
- Market List
- Rep profile details
- Click Save (Save All Settings) when finished.
- Success message: profile / settings updated.
Good to know
- Many toggles are company-specific — only options your company uses will matter.
- Use Quick Links from the edit page for Import / Export / Invite / Update User Settings as needed.
Enable or disable an account
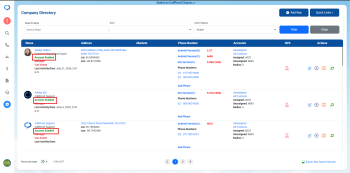 Click the Account Enabled |
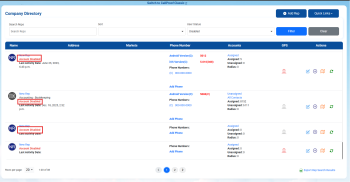 Click the Account Disabled |
Disable
- On the list, click Account Enabled (green) for that user.
- Confirm in the disable popup.
- Success: Rep account disabled successfully.
- Status changes to Account Disabled.
Enable
- Click Account Disabled.
- Success: Rep account enabled successfully.
Good to know
- Disabling blocks login/access without removing historical activity.
- Filter by Disabled or Both to find inactive users.
Row actions
| Action
|
What it does
|
| Edit
|
Open Company Directory Edit for that user
|
| Add Task
|
Start a task for that user (/followups/add_task/…)
|
| Map
|
Open that user’s location history
|
| Sync
|
Open / update GPS sync settings for the user
|
| Add Phone
|
Add a phone number to the rep
|
| Phone links
|
Open the user’s phone list (/user_phones/…)
|
Quick Links
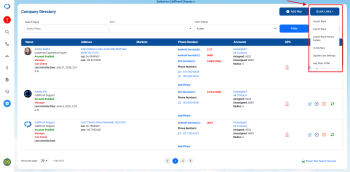
Company Directory Quick Links
| Link
|
Purpose
|
| Import Reps
|
Upload a file of reps (sample CSV available from the import flow)
|
| Export Reps
|
Download company reps (/users/export/)
|
| Export Reps History Details
|
Export historical rep details (/users/export/history/)
|
| Invite Reps
|
Enter up to five emails and send invites
|
| Update User Settings
|
Bulk / master user settings screen
|
| Rep Stats HTML
|
Save / update company rep stats HTML content
|
Invite Reps — steps
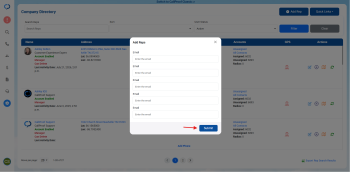
Company Directory Invite Reps
- Quick Links → Invite Reps.
- Enter one or more emails (up to five fields).
- Click Submit.
- Success when invites are sent (for example new user added and invite sent).
Typical workflow
- Open
/users/.
- Filter to Active users.
- Add Rep or Invite Reps for a new teammate.
- Open Edit and set Role, Markets, User Access, and phones.
- Save.
- Confirm the row shows Account Enabled, correct markets, and GPS as intended.
- When someone leaves, Disable the account instead of deleting history.
Tips and important notes
- Company Directory manages people who log into CallProof; Accounts/Contacts manage customers.
- Use Both under User Status when searching for someone who may be disabled.
- Manager and Can Delete flags appear under the name for quick scanning.
- Dealer companies see extra Store / Caller ID fields on the list and filter.
- After creating a user, finish setup on the edit page (markets and access matter as much as the password).
- Export/import are for bulk admin work; day-to-day changes use Add Rep and Edit.
Need help?
- Cannot open Company Directory: ask a manager for Can View Company Directory / menu access
- User cannot log in: confirm Account Enabled and that invite/password setup completed
- Wrong markets or contacts: edit the user and fix Market List / contact radius access
- Import failed: download the sample file and match columns before re-uploading
- Other issues: email support@callproof.com


